Reading view

Matrix Push C2 abuses browser notifications to deliver phishing and malware

Cybercriminals are using browser push notifications to deliver malware and phishing attacks.

Researchers at BlackFog described how a new command-and-control platform, called Matrix Push C2, uses browser push notifications to reach potential victims.

When we warned back in 2019 that browser push notifications were a feature just waiting to be abused, we noted that the Notifications API allows a website or app to send notifications that are displayed outside the page at the system level. This means it lets web apps send information to a user even when they’re idle or running in the background.

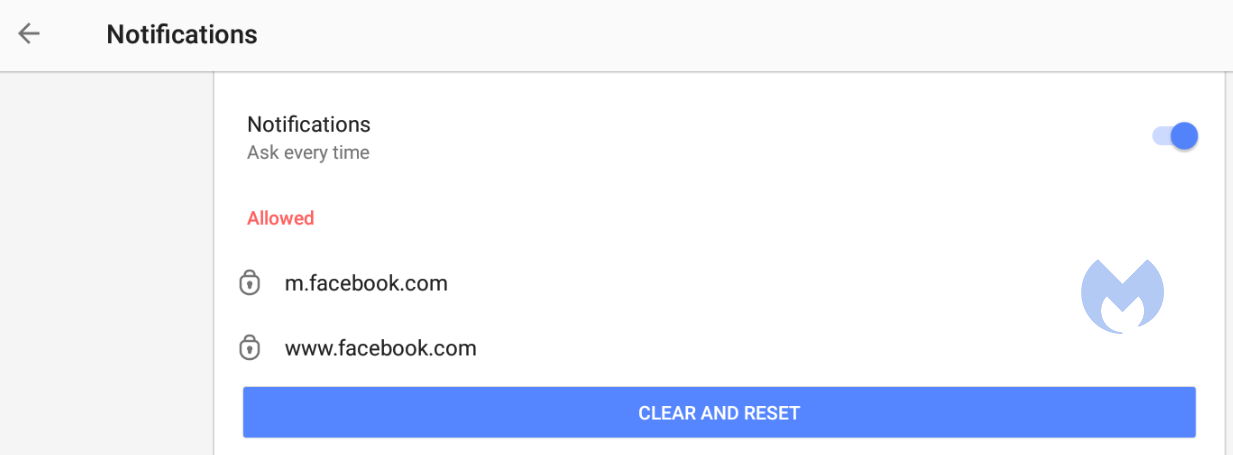
Here’s a common example of a browser push notification:

Browser notification with Block and Allow

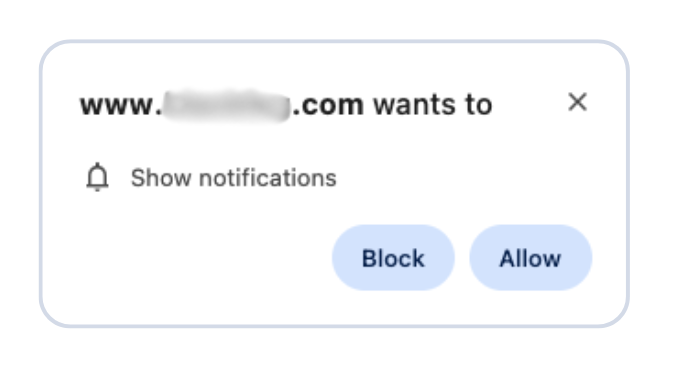
This makes it harder for users to know where the notifications come from. In this case, the responsible app is the browser and users are tricked into allowing them by the usual “notification permission prompt” that you see on almost every other website.

But malicious prompts aren’t always as straightforward as legitimate ones. As we explained in our earlier post, attackers use deceptive designs, like fake video players that claim you must click “Allow” to continue watching.

Click allow to play video?

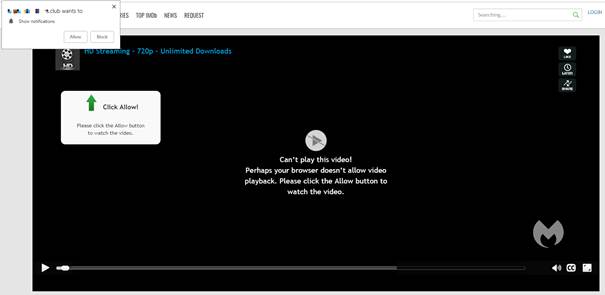
In reality, clicking “Allow” gives the site permission to send notifications, and often redirects you to more scam pages.

Granting browser push notifications on the wrong website gives attackers the ability to push out fake error messages or security alerts that look frighteningly real. They can make them look as if they came from the operating system (OS) or a trusted software application, including the titles, layout, and icons. There are pre-formatted notifications available for MetaMask, Netflix, Cloudflare, PayPal, TikTok, and more.

Criminals can adjust settings that make their messages appear trustworthy or cause panic. The Command and Control (C2) panel provides the attacker with granular control over how these push notifications appear.

Matrix C2 panel
Image courtesy of BlackFog

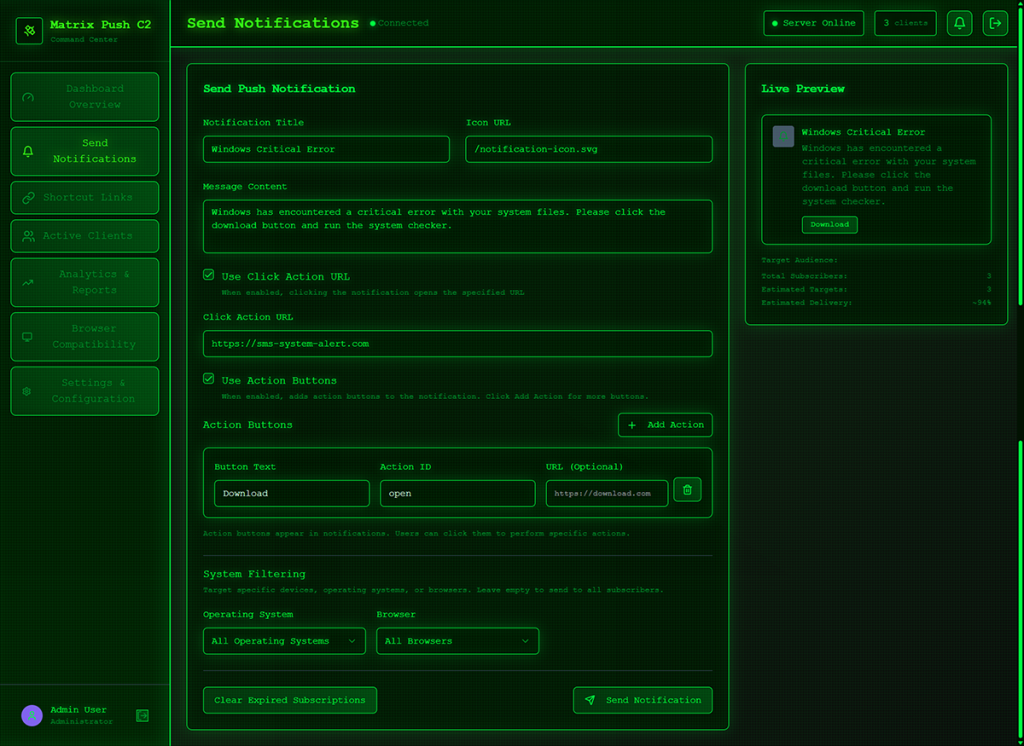
But that’s not all. According to the researchers, this panel provides the attacker with a high level of monitoring:

“One of the most prominent features of Matrix Push C2 is its active clients panel, which gives the attacker detailed information on each victim in real time. As soon as a browser is enlisted (by accepting the push notification subscription), it reports data back to the C2.”

It allows attackers to see which notifications have been shown and which ones victims have interacted with. Overall, this allows them to see which campaigns work best on which users.

Matrix Push C2 also includes shortcut-link management, with a built-in URL shortening service that attackers can use to create custom links for their campaign, leaving users clueless about the true destination. Until they click.

Ultimately, the end goal is often data theft or monetizing access, for example, by draining cryptocurrency wallets, or stealing personal information.

How to find and remove unwanted notification permissions

A general tip that works across most browsers: If a push notification has a gear icon, clicking it will take you to the browser’s notification settings, where you can block the site that sent it. If that doesn’t work or you need more control, check the browser-specific instructions below.

Chrome

To completely turn off notifications, even from extensions:

  • Click the three dots button in the upper right-hand corner of the Chrome menu to enter the Settings menu.
  • Select Privacy and Security.
  • Click Site settings.
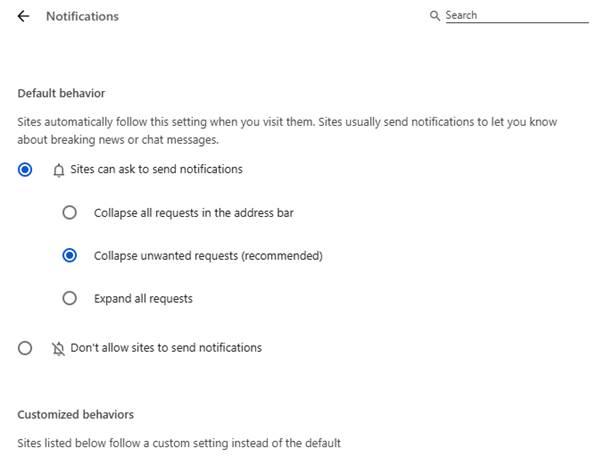
  • Select Notifications.
  • By default, the option is set to Sites can ask to send notifications. Change to Don’t allow sites to send notifications if you want to block everything.
Chrome notifications settings

For more granular control, use Customized behaviors.

  • Selecting Remove will delete the item from the list. It will ask permission to show notifications again if you visit their site.
  • Selecting Block prevents permission prompts entirely, moved them to the block list.
Firefox Notifications settings
  • You can also check Block new requests asking to allow notifications at the bottom.
Web Site notifications settings

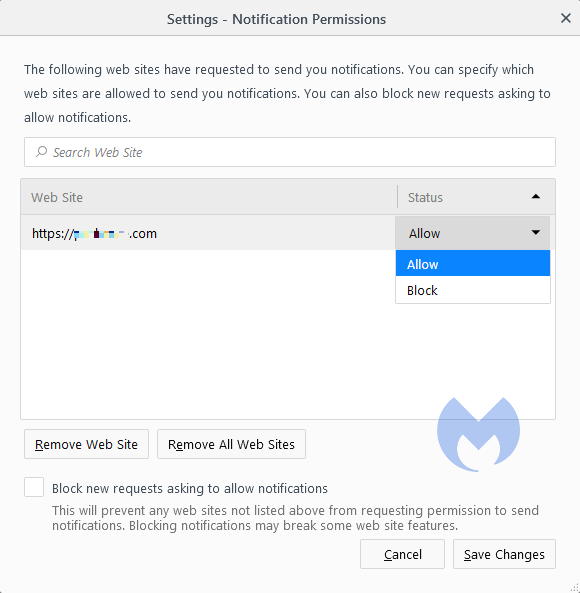
In the same menu, you can also set listed items to Block or Allow by using the drop-down menu behind each item.

Opera

Opera’s settings are very similar to Chrome’s:

  • Open the menu by clicking the O in the upper left-hand corner.
  • Go to Settings (on Windows)/Preferences (on Mac).
  • Click Advanced, then Privacy & security.
  • Under Content settings (desktop)/Site settings (Android) select Notifications.
website specific notifications Opera

On desktop, Opera behaves the same as Chrome. On Android, you can remove items individually or in bulk.

Edge

Edge is basically the same as Chrome as well:

  • Open Edge and click the three dots (…) in the top-right corner, then select Settings.
  • In the left-hand menu, click on Privacy, search, and services.
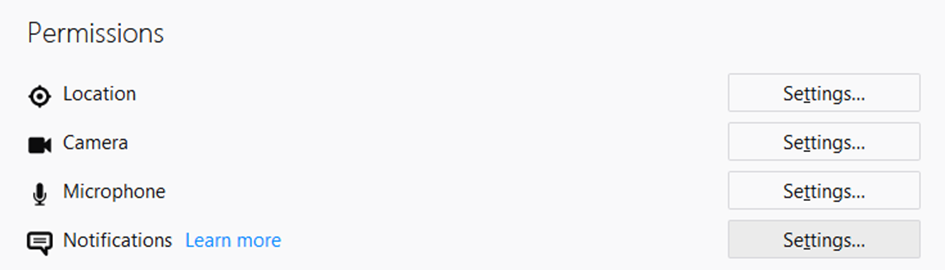
  • Under Sites permissions > All permissions, click on Notifications.
  • Turn on Quiet notifications requests to block all new notification requests. 
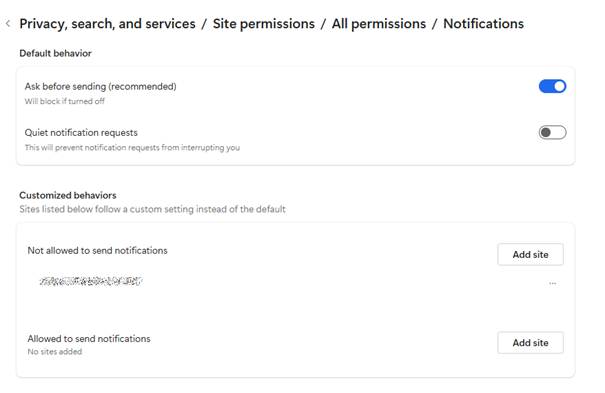
  • Use Customized behaviors for more granular control.

Safari

To disable web push notifications in Safari, go to Safari > Settings > Websites > Notifications in the menu bar, select the website from the list, and change its setting to Deny. To stop all future requests, uncheck the box that says Allow websites to ask for permission to send notifications in the same window. 

For Mac users

  1. Go to Safari > Settings > Websites > Notifications.
  2. Select a site and change its setting to Deny or Remove.
  3. To stop all future prompts, uncheck Allow websites to ask for permission to send notifications.

For iPhone/iPad users

  1. Open Settings.
  2. Tap Notifications.
  3. Scroll to Application Notifications and select Safari.
  4. You’ll see a list of sites with permission.
  5. Toggle any site to off to block its notifications.

We don’t just report on threats—we help safeguard your entire digital identity

Cybersecurity risks should never spread beyond a headline. Protect your, and your family’s, personal information by using identity protection.

  •  

Fake calendar invites are spreading. Here’s how to remove them and prevent more

We’re seeing a surge in phishing calendar invites that users can’t delete, or that keep coming back because they sync across devices. The good news is you can remove them and block future spam by changing a few settings.

Most of these unwanted calendar entries are there for phishing purposes. Most of them warn you about a “impending payment” but the difference is in the subject and the action they want the target to take.

Sometimes they want you to call a number:

"Call this number" scams

And sometimes they invite you to an actual meeting:

fake Geek Squad billing update meeting

We haven’t followed up on these scams, but when attackers want you to call them or join a meeting, the end goal is almost always financial. They might use a tech support scam approach and ask you to install a Remote Monitoring and Management tool, sell you an overpriced product, or simply ask for your banking details.

The sources are usually distributed as email attachments or as download links in messaging apps.

How to remove fake entries from your calendar

This blog focuses on how to remove these unwanted entries. One of the obstacles is that calendars often sync across devices.

Outlook Calendar

If you use Outlook:

  • Delete without interacting: Avoid clicking any links or opening attachments in the invite. If available, use the “Do not send a response” option when deleting to prevent confirming that your email is active.
  • Block the sender: Right-click the event and select the option to report the sender as junk or spam to help prevent future invites from that email address.
  • Adjust calendar settings: Access your Outlook settings and disable the option to automatically add events from email. This setting matters because even if the invite lands in your spam folder, auto-adding invites will still put the event on your calendar.
    Outlook accept settings
  • Report the invite: Report the spam invitation to Microsoft as phishing or junk.
  • Verify billing issues through official channels: If you have concerns about your account, go directly to the company’s official website or support, not the information in the invite.

Gmail Calendar

To disable automatic calendar additions:

  • Open Google Calendar.
  • Click the gear icon and select Settings in the upper right part of the screen.
    Gmail calendar settings
  • Under Event settings, change Add invitations to my calendar to either Only if the sender is known or When I respond to the invitation email. (The default setting is From everyone, which will add any invite to your calendar.)
  • Uncheck Show events automatically created by Gmail if you want to stop Gmail from adding to your calendar on its own.

Android Calendar

To prevent unknown senders from adding invites:

  • Open the Calendar app.
  • Tap Menu > Settings.
  • Tap General > Adding invitations > Add invitations to my calendar.
  • Select Only if the sender is known.

For help reviewing which apps have access to your Android Calendar, refer to the support page.

Mac Calendars

To control how events get added to your Calendar on a Mac:

  • Go to Apple menu > System Settings > Privacy & Security.
  • Click Calendars.
  • Turn calendar access on or off for each app in the list.
  • If you allow access, click Options to choose whether the app has full access or can only add events.

iPhone and iPad Calendar

The controls are similar to macOS, but you may also want to remove additional calendars:

  • Open Settings.
  • Tap Calendar > Accounts > Subscribed Calendars.
  • Select any unwanted calendars and tap the Delete Account option.

Additional calendars

Which brings me to my next point. Check both the Outlook Calendar and the mobile Calendar app for Additional Calendars or subscribed URLs and Delete/Unsubscribe. This will stop the attacker from being able to add even more events to your Calendar. And looking in both places will be helpful in case of synchronization issues.

Several victims reported that after removing an event, they just came back. This is almost always due to synchronization. Make sure you remove the unwanted calendar or event everywhere it exists.

Tracking down the source can be tricky, but it may help prevent the next wave of calendar spam.

How to prevent calendar spam

We’ve covered some of this already, but the main precautions are:

  • Turn off auto‑add or auto‑processing so invites stay as emails until you accept them.
  • Restrict calendar permissions so only trusted people and apps can add events.
  • In shared or resource calendars, remove public or anonymous access and limit who can create or edit items.
  • Use an up-to-date real-time anti-malware solution with a web protection component to block known malicious domains.
  • Don’t engage with unsolicited events. Don’t click links, open attachments, or reply to suspicious calendar events such as “investment,” “invoice,” “bonus payout,” “urgent meeting”—just delete the event.
  • Enable multi-factor authentication (MFA) on your accounts so attackers who compromise credentials can’t abuse the account itself to send or auto‑accept invitations.

Pro tip: If you’re not sure whether an event is a scam, you can feed the message to Malwarebytes Scam Guard. It’ll help you decide what to do next.

The Really Really Sale

We don’t just report on threats—we remove them

Cybersecurity risks should never spread beyond a headline. Keep threats off your devices by downloading Malwarebytes today.

  •  

How to set up two factor authentication (2FA) on your Instagram account

Two-factor authentication (2FA) isn’t foolproof, but it is one of the best ways to protect your accounts from hackers.

It adds a small extra step when logging in, but that extra effort pays off. Instagram’s 2FA requires an additional code whenever you try to log in from an unrecognized device or browser—stopping attackers even if they have your password.

Instagram offers multiple 2FA options: text message (SMS), an authentication app (recommended), or a security key.

Instagram 2FA options

Here’s how to enable 2FA on Instagram for Android, iPhone/iPad, and the web.

How to set up 2FA for Instagram on Android

  1. Open the Instagram app and log in.
  2. Tap your profile picture at the bottom right.
  3. Tap the menu icon (three horizontal lines) in the top right.
  4. Select Accounts Center at the bottom.
  5. Tap Password and security > Two-factor authentication.
  6. Choose your Instagram account.
  7. Select a verification method: Text message (SMS), Authentication app (recommended), or WhatsApp.
    • SMS: Enter your phone number if you haven’t already. Instagram will send you a six-digit code. Enter it to confirm.
    • Authentication app: Choose an app like Google Authenticator or Duo Mobile. Scan the QR code or copy the setup key, then enter the generated code on Instagram.
    • WhatsApp: Enable text message security first, then link your WhatsApp number.
  8. Follow the on-screen instructions to finish setup.

How to set up 2FA for Instagram on iPhone or iPad

  1. Open the Instagram app and log in.
  2. Tap your profile picture at the bottom right.
  3. Tap the menu icon > Settings > Security > Two-factor authentication.
  4. Tap Get Started.
  5. Choose Authentication app (recommended), Text message, or WhatsApp.
    • Authentication app: Copy the setup key or scan the QR code with your chosen app. Enter the generated code and tap Next.
    • Text message: Turn it on, then enter the six-digit SMS code Instagram sends you.
    • WhatsApp: Enable text message first, then add WhatsApp.
  6. Follow on-screen instructions to complete the setup.

How to set up 2FA for Instagram in a web browser

  1. Go to instagram.com and log in.
  2. Open Accounts Center > Password and security.
  3. Click Two-factor authentication, then choose your account.
    • Note: If your accounts are linked, you can enable 2FA for both Instagram and your overall Meta account here.Instagram accoounts center
  4. Choose your preferred 2FA method and follow the online prompts.

Enable it today

Even the strongest password isn’t enough on its own. 2FA means a thief must have access to your an additional factor to be able to log in to your account, whether that’s a code on a physical device or a security key. That makes it far harder for criminals to break in.

Turn on 2FA for all your important accounts, especially social media and messaging apps. It only takes a few minutes, but it could save you hours—or even days—of recovery later.It’s currently the best password advice we have.


We don’t just report on threats – we help safeguard your entire digital identity

Cybersecurity risks should never spread beyond a headline. Protect your—and your family’s—personal information by using identity protection.

  •  

How to set up two-factor authentication (2FA) on your Facebook account

While two-factor authentication (2FA) is not completely fool-proof, it is one of the best ways to protect your accounts from hackers. It adds an extra step when logging in, which is a small extra effort for you, but it dramatically boosts your security.

With 2FA, you’ll be asked for a special login code when signing in from a device or browser Facebook doesn’t recognize—even if someone already knows your password.

Here’s how to enable 2FA on Facebook for Android, iOS, and the web.

How to set up 2FA for Facebook on Android

  1. Open the Facebook app (make sure you’re signed in).
  2. Tap the menu (three horizontal lines).
  3. Choose Settings & Privacy > Settings.
  4. In the Accounts Center tap Password and security.
  5. Tap Two-factor authentication and select your account your want to protect.
  6. Re-enter your password. Facebook will send a one-time code to your phone or email to confirm it’s you.
  7. Pick your preferred security method:
    • Authentication app (recommended) – such as Google Authenticator or Authy.
    • Text message (SMS) or WhatsApp – codes sent to your phone number.
    • Security key – a USB or Bluetooth device.
    • Recovery codes – backup codes to use if other methods aren’t available.
  8. Follow on-screen instructions to complete the setup.

How to set up 2FA for Facebook on iPhone or iPad

  1. Open the Facebook app (make sure you’re signed in).
  2. Tap your profile picture in the bottom right corner.
  3. Go to Settings & Privacy > Settings.
  4. Tap on Accounts Center, then Password and security.
  5. Tap Two-factor authentication and select your account.
  6. Re-enter your password. Facebook will send a one-time code to your phone or email to confirm your identity.
  7. Choose your preferred method:
    • Authentication app (recommended) – such as Google Authenticator or Authy.
    • Text message (SMS) or WhatsApp – codes sent to your phone number.
    • Security key – a USB or Bluetooth device.
    • Recovery codes – backup codes to use if other methods aren’t available.
  8. Follow on-screen instructions to complete the setup.

How to set up 2FA for Facebook on the web

  1. Go to facebook.com/settings (or from the home screen, click your profile picture and then Settings & privacy).
  2. Navigate to Password and security.
    Accounts Center Facebook
  3. Click Two-factor authentication, then select your account.
  4. Facebook will send a one-time code to your WhatsApp or email to confirm it’s you, and may ask you to re-enter your password.
  5. Choose your preferred method:
    • Authentication app (recommended) – such as Google Authenticator or Authy.
    • Text message (SMS) or WhatsApp – codes sent to your phone number.
    • Security key – a USB or Bluetooth device.
    • Recovery codes – backup codes to use if other methods aren’t available.
  6. Follow on-screen instructions to complete the setup.

Why you should enable it today

Even the strongest password can be stolen. With 2FA, attackers would also need access to your additional factor to be able to log in to your account, whether that’s a code on a physical device or a security key. That makes hijacking your account much harder.

We recommend you set up 2FA on all your important accounts, including messaging and social media accounts. It only takes a few minutes, but can save you from hours or even days of stress later. It’s currently the best password advice we have.


We don’t just report on threats – we help protect your social media

Cybersecurity risks should never spread beyond a headline. Protect your social media accounts by using Malwarebytes Identity Theft Protection.

  •  

How to set up two-step verification on your WhatsApp account

Two step verification is the name Meta uses for what is generally referred to as Two-factor authentication (2FA). 2FA is not fool-proof, but it is one of the best ways to protect your accounts from hackers.

It adds an extra step when logging in, which is a small extra effort for you, but it dramatically boosts your security. WhatsApp 2FA, called Two-Step Verification, requires you to enter a PIN code when registering your phone number on a new device, stopping hackers even if they have your SMS code.

Here’s how to enable 2FA on WhatsApp for Android and iOS.

How to set up two-step verification for WhatsApp on Android

  1. Open WhatsApp.
  2. Go to Settings (you’ll see it if you tap the three dots, usually located in the upper right corner).
  3. Tap Account.
  4. Select Two-step verification.
  5. Tap Enable.
  6. Create a unique 6-digit PIN and confirm it.
  7. Optionally, you can add your email address to recover your PIN if you forget it.
  8. Tap Save.

Now, whenever you verify your phone number on WhatsApp and every so often when you open the app, you’ll need the 6-digit PIN.

How to set up two-step verification for WhatsApp on iPhone or iPad

  1. Open the WhatsApp app on your iPhone or iPad.
  2. Tap on Settings (the gear icon)
  3. Tap on Account.
  4. Select Two-step verification.
  5. Tap on Turn on or Set up PIN to begin.
  6. Enter a six-digit PIN of your choice, then enter it again to confirm it.
  7. Optionally, you can add your email address to recover your PIN if you forget it.
  8. Tap Save or Done.
  9. If you added an email, enter the verification code sent to that email to complete the process.

Now, whenever you verify your phone number on WhatsApp and every so often when you open the app, you’ll need the 6-digit PIN.

Enable it today if you can

Even the strongest password isn’t enough on its own. 2FA means a thief must have access to your an additional factor to be able to log in to your account, whether that’s a code on a physical device or a security key. In addition to your password, this makes an account takeover much harder.

We recommend you set up 2FA on all your important accounts, including messaging and social media accounts. Do it today if you get a chance: It only takes a few minutes but can save you from hours or even days of headaches later. It’s currently the best password advice we have.


We don’t just report on phone security—we provide it

Cybersecurity risks should never spread beyond a headline. Keep threats off your mobile devices by downloading Malwarebytes for iOS, and Malwarebytes for Android today.

  •